.jpg)
.jpg)
.jpg)
.jpg)
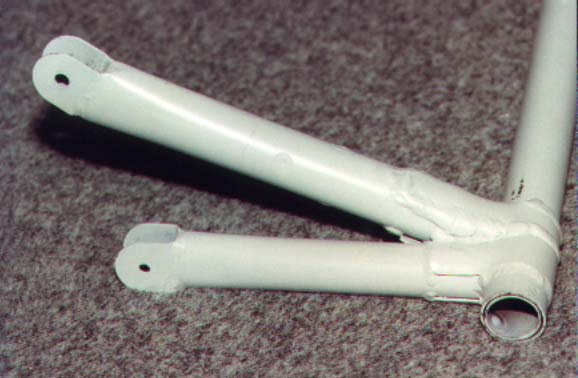
Attached are my pictures of the flap mod. The key to the project is the addition of the reinforcement tube inside of the normal weldment tube which is rosette welded every 6 inches to make sure that there is no torsional twisting which causes the flaps to deploy differently. Everything else seems quite straight forward, but then I have done it once and everything seems simple after you have figured it out.
The inner tube is a piece of 4130 steel tubing, .875 inch (7/8) outside diameter, .035 wall thickness. I got this from Aircraft Spruce, along with some .025 sheet to use as the reinforcing strap around the outside of the tube to secure the actuating arm.The first step was to install the second tube inside of the weldment. The tube I purchased just slipped into the original tube. This was a bit of a chore, as the original welds for the arms caused some buildup inside the tube. After about ten minutes using a die grinder and file, I was able to slide the inner tube inside. Prior to this assembly, I drilled holes every 6 inches, on the four sides of the outside tube which I then used to rosette weld the two tubes after sliding them together.
I measured the angle between the stock location of the actuating arm pointing forward and the flap arms pointing aft, and it came out 159 degrees (21 degrees up from flat). I measured the length of the arm from the tube to the center of the pivot bolt hole and then cut off the arm carefully so that I did not nick the tube. I then took a second short piece of the .875, cut a fish mouth on it and welded it to the main tube, as close to the flap arm as possible, and 21 degrees up from the flap arm. I then slipped the actuating arm I had cut off, over this stub of .875 tube, and was able to easily set the length to that I measured when the arm was in it's original position. I rosette welded this in about 8 places. I then cut a 1 inch strap from the .025 4130 sheet which I wrapped around the tube and the new arm, as it and the other arms had been reinforced. I then welded everything together, as can be seen in the first photo. As can be seen by the second and third photo, I positioned the arms so that the flap motor sat just inside of the F622 former. In doing this, my arm was about 1/2 inch into the baggage compartment. Had I welded the actuating arm angles slightly outboard, It would have been possible to use the original side plate on the baggage area with a slot in the top for the motor arm to pass through. However, I kind of like the side cover that encloses the whole assembly. In the final picture, I installed a center brace and added two eyes near the bottom for baggage tie downs. As you can see, there is now a nice space behind the seats and between them.Please feel free to post my email address and phone number should anyone have questions tmjordan@flash.net